Developers love to share code in the form of packages, full apps, or tiny modules. Sharing is great, but one area that a lot of developers forget about is the README file. This file is now arguably one of the most important pieces for your project and one that a lot of users don’t spend any time on.
A README first started as a guide for developers. You would access it after downloading the code, and it would show instructions related to configuration, installation, copyright, troubleshooting, and more. As popular code repositories started implementing these as the main page of the project they have now transitioned from being straight technical information to being a project home page. This shift in display means they have transitioned from straight developer docs to marketing and basic project information.
Think about the last open source project you looked at. Chances are, you had a problem and needed a solution. You found something that sounded reasonable and looked at the readme to see if it would indeed solve it. Of course, that is your primary reason for looking but you should also consider the following questions:
Will it solve my problem?
Can I trust this code?
Can I trust the team/developer who created it?
Will I be able to get help if I’m stuck?
Are issues or pull requests dealt with?
Am I willing to keep this updated if this project dies?
Can I build this easier myself?
If you are uncomfortable answering yes to most of these, it’s time to move on. Even if a package would work, the developer has a responsibility to instill confidence in the project because, like it or not, you are the one who is taking the risk by including their work.
By working through these common questions, let’s look at how to build a readme that instills trust, answers objections, and shows the readers why your code is worthy of being included in their project.
Readme Structure
The structure of a readme can take various forms. I’ve seen some cover every possible scenario, and I’ve seen others with one sentence: “Read the source.” Of course, telling people to read the source is not ideal and covering everything is difficult, but you can find a happy medium.
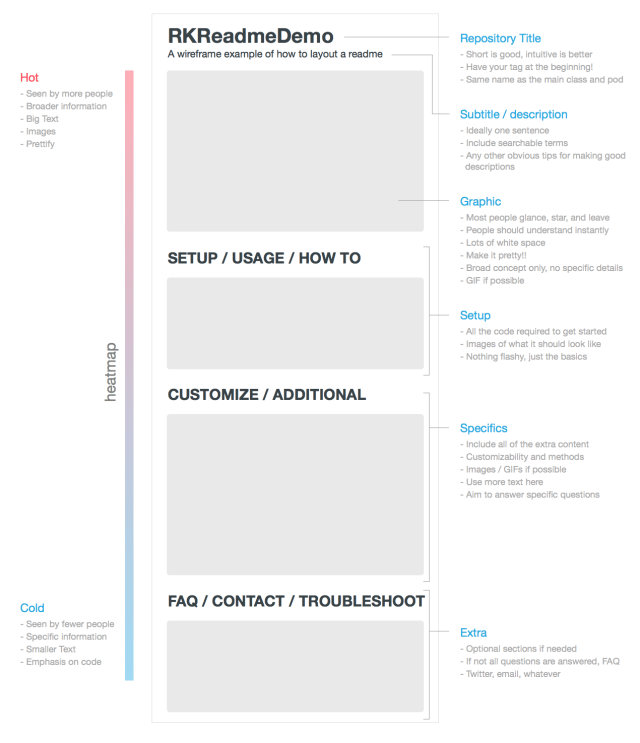
Richard Kim created the following heat map showcasing how users view your readme and outline a nice structure:

He suggests an image, lead paragraph, installation, code samples, and then continuing with everything else.
I would propose changing this structure and add in an introduction paragraph between the image and the code samples. Here is the new outline:
Image
The Lead
Code Samples
Installation
Config
Everything else…
Let’s go through this structure and outline what each section should accomplish and what its primary goal is.
Images and Media
Visuals are important and having one allows people sharing your project to include a picture. It also helps build confidence by showing a level of care.
“A header or logo image with the readme shows you care about the presentation,” said Matt Stauffer, owner of Tighten.co. “Which makes me think it’s more likely the code will have more attention paid to the details and maintenance.”
If you care about presentation, then you care even more about the code. Another nice touch is to add an animated gif or a video highlighting some of the best features and highlights.
A looping, animated GIF will be watched over and over, scrutinized and understood. A paragraph of text will be ignored. — Taskwarrior project
Here a few tools and resources to create these easily:
Animated Gif Tools
Animated Gif Tutorials
Animated Gif Workflow by Wes Bos
Designing Gifs by Invision
Image Tools
Pablo and Sprout Social both allow you to upload an image and overlay text on it. Perfect for building images for social media sharing.
Canva is a more full featured app and offers both free and paid assets.
Once you have your assets ready, it is time to create your introduction.
The Introduction or Lead
The introduction, or the “lede” in journalism, is your first chance to interest the reader and grab their attention to continue reading. It should be a few sentences that explain exactly what the purpose of the code is, why someone would want to use it, and how it works. Answer the what, why, and the how.
When you sit down to write this, it’s important to remember you are the expert. You are intimate with the code; you know everything about it. Others don’t. So make it clear and concise.
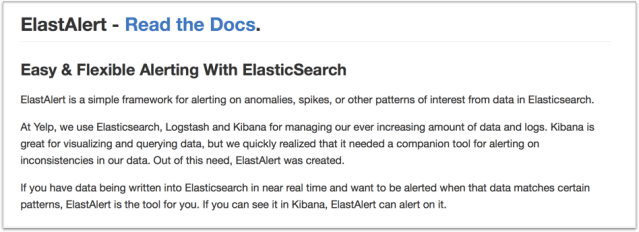
Here are a few examples that came directly through the trending page on Github:


Now, let’s move on to creating code samples.
Code Samples
After the introduction is a great place to put some select code samples. This section gives the reader a feel for how it looks and what it does and is the first introduction into your API.
For example, if you are a building an image processing library an example to include here would be resizing and processing:
$image = (new Image)->resize(100, 100)->convert(‘greyscale’);
Or if you are building a package to generate the total number of social shares for a URL:
$shares = (new SocialButler)->count($url);
These examples are used to reinforce the trust you started building in the introduction and get the user to start thinking about how much time this is going to save them. These are not the same as documentation…that’s still coming.
Configuration and Usage
Next, comes the bulk of your readme. The configuration and usage outlines all the things you can do. If we continue using the fictional packages, this would be a list of all the API methods and how to use them.
It’s a good reminder to put yourself in a beginner’s mindset. Will they understand it? Will they be able to solve their problem with your code?
Or as @lizthedeveloper said:
Your docs don't have enough:
Simple examples
Real-world examples
Typical use cases
Explanations for beginners
They can never have enough.
— future infinitive (@lizthedeveloper) December 16, 2015
Google also performed a case study on “How developers search for code,” which found the most common search, representing over a third (33.5%) of the surveys, pertained to specific API, library information, or functional examples.
We aren’t documenting enough of the code we put out, expecting users to either magically know how to use it or to get help elsewhere.
Copy Editing
After you’ve spent all this time building your documentation, you are excited to launch. However, it’s time to take a step back and start editing your copy to ensure everything is clear, understandable, and free from mistakes.
Editing a readme is no different from editing a blog post or any other content. I like to walk away from it for a few hours up to a few days. That way you’ve created distance from your original words and come back to it fresh. Some things to look for are:
Did you communicate clearly?
Could your sentences be improved?
Any misspellings?
Once you’ve done this pass and are happy, you can utilize some online tools to improve further. I like using Grammarly and Hemingway.
Discovery
After you’ve polished the readme and have everything ready, how are you going to market your code? As DHH once said, “Anything worth releasing, is worth marketing.”
There are many different ways of marketing your code: announce to the world on social media, write a blog post, email friends, make a forum post, etc. All these are indeed worth doing, but if you don’t have a large following, it can feel as if it’s falling on deaf ears.
Another option is to pitch it to news sites. There are many niche news sites covering every type of programming language, and they are always looking for content. However, due to time constraints, it’s difficult for journalists to spend time researching and writing about your code.
You can help them make it easy to cover your work by creating a mini press release. You already have all the resources needed in the readme so you can add the images, gif’s, videos, and highlight code samples. Then create a little story around it, because everyone loves reading a story.
If you’d like more ideas on creating a press release check out this medium article on the subject and how they pitched an iOS keyboard to the media.
Readme Generator
To make creating the readme outlined here easier, I teamed up with Michael Dyrynda and created an open-source readme generator. If you would like to find out how it was built check out his tutorial on how he utilized Vue.js to build it.

Just fill out the form and you can see a live preview on the right side, then once you are happy hit “fetch markdown” to copy and paste into your projects.
With this guide and the free resource, you can take your readme to the next level.